E2 | Cracked Drywall, Radiator Cover | Ask This Old House
Season 23 Episode 2 | 23m 42sVideo has Closed Captions
Mauro repairs a cracked wall; Richard installs radiator baseboard covers.
Mauro Henrique demonstrates how to repair cracked drywall; the team tries to guess the correct use of Tom Silva's black inflatable square; Mark McCullough walks through the evolution of bricks; Richard Trethewey shows a homeowner two different types of covers to upgrade his radiator baseboards.
Problems playing video? | Closed Captioning Feedback
Problems playing video? | Closed Captioning Feedback
Funding for THIS OLD HOUSE is provided by The Home Depot and Renewal By Andersen.
Support provided by:

E2 | Cracked Drywall, Radiator Cover | Ask This Old House
Season 23 Episode 2 | 23m 42sVideo has Closed Captions
Mauro Henrique demonstrates how to repair cracked drywall; the team tries to guess the correct use of Tom Silva's black inflatable square; Mark McCullough walks through the evolution of bricks; Richard Trethewey shows a homeowner two different types of covers to upgrade his radiator baseboards.
Problems playing video? | Closed Captioning Feedback
How to Watch Ask This Old House
Ask This Old House is available to stream on pbs.org and the free PBS App, available on iPhone, Apple TV, Android TV, Android smartphones, Amazon Fire TV, Amazon Fire Tablet, Roku, Samsung Smart TV, and Vizio.
Keep Exploring

This Old House Insider Newsletter
Get This Old House exclusive stories, tips, and behind-the-scenes information delivered right to your inbox every month.Providing Support for PBS.org
Learn Moreabout PBS online sponsorship♪♪ Kevin: On "Ask This Old House," our experts travel across the country to answer questions about your house.
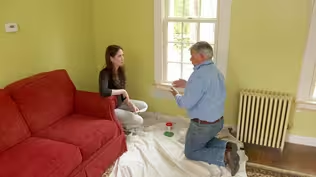
♪♪ Today, Mauro shows a homeowner the correct way to repair a wall crack.
Mauro: Okay, press the tape down.
Stretch it out all the way down.
Kevin: Then we challenge our crew with a game of "What Is It?"
and Richard helps a homeowner update their baseboard covers... Richard: What do you think?
Man: I think this looks great.
Kevin: ...on "Ask This Old House."
♪♪ Mauro: Hello?
Chris: Hey, Mauro.
Mauro: Chris.
Chris: Welcome to our home.
Mauro: Thank you.
Nice to meet you.
Chris: Likewise.
Mauro: Wow.
Look at this house.
I really like this.
Chris: Yeah.
Thank you.
I think it's built in 2013.
Mauro: 2013?
Yeah?
Chris: And my wife and I moved in in 2014.
Mauro: Wow.
Look at this kitchen.
Really nice.
Chris: Yeah.
So at that time, it was just us.
Mauro: Okay.
Chris: And since that time, we've had two kids, and we moved the laundry upstairs... Mauro: On the second floor.
Chris: ...to account for all the little ones' laundry.
And one of the things, so we had to have a plumber open up this wall.
And when they did that, this crack appeared, and I've tried to patch it.
I don't know what to do it.
It keeps coming back.
Mauro: Well, I can see the crack going across up there and coming down here on this wall, and it stops right there.
And also I see a crack on this side going down and across the bottom here.
When I see cracks showing up like that, it means there was no mesh tape applied to it.
Mauro: Okay?
Chris: Got it.
Mauro: That's why you see the crack keeps coming back all the time.
Chris: So how can you tell it's mesh tape that would be the fix?
Mauro: Just because I can see the crack showing up.
And then if you knock on here... [ Knocking ] ...you can see there's nothing.
The surface is very flat, but the two pieces of drywall are moving and then forming the cracks.
That's why you should've used the mesh tape.
Also, the materials contract and expand a lot, and it helps to show more cracks coming up on the face of the wall.
So we're going to open up those cracks a little bit.
We're going to fill it up with the joint compound.
And then we're going to apply the mesh tape and cover the mesh tape with the junk compound.
And then those cracks might happen behind the tape, but it's not going to show up on your wall because the mesh tape will prevent that to happen.
Chris: Got it.
Mauro: Alright?
Chris: I'm excited.
Mauro: Okay.
So I'm going to step out, get some stuff that we need to fix this.
But I got a question for you.
Chris: Yeah.
Mauro: Do you remember the name or the number of this color?
Chris: As a matter of fact, we have some laying around.
I have some down in the basement.
Mauro: Oh, great.
So if it's still good, we're going to use the same paint.
I'll be right back and we're going to work.
Mauro: Alright?
Chris: Alright.
I'll get the paint.
Mauro: Okay.
Thank you.
Well, now the area's protected, let's start to open those cracks.
Let's go like this.
Chris: Why do we open the crack?
Mauro: Because we want to fill them in order to put the mesh tape on it.
Alright.
You want to give it a try?
Chris: I'll give it a try.
Mauro: Alright, let's go.
Chris: Alright.
Straight down in the crack?
Mauro: Yeah.
Go nice and slow.
Two hands holding the tool.
Yeah.
All the way down the crack.
And open up a little bit.
That's great.
Alright, Chris, now it's time for us to make the first batch of the mud.
Alright, bring this over -- the water and my margin trowel.
First, what are we going to use, you're going to add some water first.
Alright?
Chris: How do you know how much water to add?
Mauro: We'll go by eye.
Chris: Okay.
Mauro: And then we're going to use the dry mix.
Just go like that.
Chris: Do you always use the -- mix it all yourself, or you ever use, like, pre-mixed?
Mauro: You go, you know, by doing this for so long, you know how much water and how much the dry mix that you have to do it.
But you can always adjust, okay?
Chris: Mm-hmm.
Mauro: This is dry mix.
It's joint compound... and dries in about five minutes.
Chris: Oh, wow.
Mauro: Okay?
This is fast-drying stuff.
Oh, yeah.
Okay.
This mix is ready to go.
And a coat like this... and then spread.
It's not like that.
Two fingers right there.
Chris: And are you pushing pretty firmly?
Mauro: You push in kind of a, you know, not a lot of pressure.
Just enough so the mud goes into the crack.
Chris: Got it.
Mauro: Okay.
Do you want to give it a try?
Chris: Sure.
♪♪ Mauro: That's good, Chris.
Yep.
♪♪ Alright, Chris.
Time for you to put some mesh tape.
Chris: Yeah.
The key ingredient.
Mauro: Alright.
Start at the end near the cabinets.
Yeah.
Just press down with your hands.
Yeah.
Okay.
Press the tape down, yep, to hold it in place.
Chris: Okay.
Mauro: Now you're going to use your putty knife to cut down the tape, alright?
Now it's time for another pass of mud to cover the mesh tape.
Well, this is the first of two or three passes that we have to do to completely cover the mesh tape.
Alright?
Chris: Okay.
Do we, like, sand it at the end or...?
Mauro: We do sand between passes because we want the finish to be nice and smooth, ready to prime and paint.
The priming process, we're just going to prime where we have the patch done.
Let's go back.
Chris: All the way up there.
Mauro: All the way up and down.
Chris: Start in the middle here as well.
Mauro: Yeah.
Always.
Yep.
By doing that, you're going to spread that primer evenly.
Chris: Mhm.
Mauro: Just fade it out on the side so you only see -- When you paint you don't want to see that line of primer.
There we go.
Chris: I think that's good there.
Mauro: That's good.
That's perfect.
Chris: Beautiful.
Mauro: Yeah.
Oh, yeah.
Looks good.
All the primer's done.
We're going to wait about an hour, and we'll come back and we'll see if it's dry, and it's time to put the first coat of paint.
Chris: That sounds great.
Mauro: Alright?
Cool.
♪♪ ♪♪ ♪♪ Alright, Chris, first coat is done.
It's time for us to apply the second and final coat.
Chris: So I'm just focusing on cutting the primed area?
Mauro: Exactly.
Just cut the same way as you did on the first coat.
And then I'll roll the field.
♪♪ ♪♪ Chris: Wow, it looks great.
Mauro: Look at the difference between before and after.
Chris: Yeah.
Mauro: See?
Mesh tape's up, crack is fixed, paint the walls.
Looks nice.
Chris: It does.
Yeah.
And I learned a lot.
Mauro: Well, now you know if you see any crack around your house, wall, ceiling, mesh tape and you're good to go.
Chris: Yeah, I definitely learned a lot.
Mauro: Alright.
Chris.
Chris: Thank you, Mauro.
Mauro: Thanks very much for having us here.
Enjoy this beautiful house.
Chris: Thank you.
♪♪ [ Power tools whirring, hammer thudding ] ♪♪ Tom: Alright.
Here we go.
It's black, it's square, and it has a ball on the end of it.
Richard: Okay.
Tom: What is it?
Kevin: That's all you got?
Tom: That's all I got.
Richard: Don't over-describe.
Tom: It's so easy.
It's so easy.
I don't want to give it away.
Jenn: Do you know what this is?
It's my fresh air purse.
So when they try to make me come back inside, I need my fresh air.
Right?
So I go outside... [ Pump hissing ] ...I capture whatever season -- you can get Christmas tree season, you can get whatever season.
And I get back inside and I'm like... [ Air hissing ] ..."Oh, my God.
Okay."
Kevin: [Indistinct] would be so happy.
So happy.
So happy.
Fresh air purse.
Obviously you've not been to the gym as often as I have.
Jenn: Oh, yeah?
Kevin: Or ever.
[ Laughter ] But every once in a while I miss a day and I feel bad because I don't get my pump on.
Richard: Yeah.
Kevin: And so I want to make... Well, you know, so I just want to make sure that when I don't get my pump on, I've got a little extra something or whatever.
So on chest and pec day... Richard: You look so good.
Jenn: It's the same.
Kevin: I can just pop it...ahh.
Richard: You look so good.
Tom: Oh, my.
Kevin: [ Austrian accent ] Did you know I went to the gym today?
Richard: No, don't.
We'd have to pay Arnold some money.
Kevin: I just worked my left pec.
Tomorrow I work my right pec.
Jenn: Little uneven.
Richard: Give me that.
Give me that.
Kevin: [ Normal voice ] Take it.
Richard: This is...
This is a fabulous multi-tool for when you want to go to out to a live performance.
You go and you -- you sit down in the seat, and the person in front of you is just too tall.
It's just like you're like this.
Kevin: [ Laughs ] Richard: And you can actually -- It's not you.
Tom: I can relate.
Richard: It's not you.
It's not you!
So you just pump yourself up.
Tom: Oh, look at that.
Yeah.
Richard: It's a multi-tool.
It also is a whoopee cushion so you can clear the room.
Kevin: Back pump.
Jenn: Multi-functional.
Tom: You're gonna clear in the room anyway.
Richard: No, I'm not.
Tom: Well, I have to admit that you are the closest.
Alright?
Kevin: A whoopee cushion?
Tom: So I'm going to pick this up.
You slide that under there.
Alright.
Now this will actually lift up about 300 pounds.
Kevin: Obviously.
[ Laughter ] Tom: I use these a lot for -- for basically hanging doors and windows.
You want to plumb it, I'll level it.
I pump it up.
Look at the gap underneath.
Richard: It's just a great tool.
Kevin: [ Austrian accent ] Look at the pavers go up!
Richard: [ Austrian accent ] And then make it go down, Tommy.
Tom: See, now that it's up there, I put my shims under there.
I'm talking about a door, and you're worried about getting... Richard: Make it go down.
Tom: Here we go.
Richard: [ Normal voice ] Awesome.
Tom: Look at that.
Richard: That's cool.
♪♪ Kevin: Mark, I know you're a brick head, but you're also a Renaissance man.
You like the history of brick.
Mark: Of course.
Kevin: So, what'd you bring me?
Mark: So I brought you a whole group of brick, Kevin.
These brick right here are the oldest.
They're handmade, or what we call a molded brick.
But believe it or not, that brick is about a thousand years old.
Kevin: What?
Mark: Yeah.
Kevin: How do you know that?
Mark: Yeah.
Well, there's actually a process.
I send that brick to an engineer.
They'll extract the material from that brick, they'll analyze it, and they can actually tell you what they used for the material, and they can put it in a timeline, and they can put it into a place.
Kevin: So some guy just packed that by hand into a mold.
Mark: Right.
Kevin: Same with these here?
Mark: Same with these.
This particular brick is from the 1600s.
It comes from a chimney from the oldest house in Connecticut.
Kevin: So you can tell a handmade brick by just sort of the soft edges, the rough face or whatever?
Mark: Yeah.
Absolutely.
Kevin: And this, something with crisp, clean lines like this... Mark: Yep.
Kevin: This is machine made.
Mark: Yeah.
That's manufactured.
Kevin: And story with this?
Mark: So one of the oldest brick yards in this part of the country.
Kevin: Alright.
And so again machine made on these?
Oh, wow.
That's heavy.
Mark: That's right.
Kevin: That's way heavier.
Mark: So this brick, if you had a couple bucks back in the day, this is what we call a waterstruck brick.
It's made in a mold that's wet.
So that's why they call it waterstruck.
But they cook it for a lot longer than they would cook these.
Kevin: So the longer you cook it, what, the drier, harder it becomes?
Mark: Exactly.
Kevin: And that's strength?
Mark: Exactly.
Kevin: Huh.
Mark: Yep.
Kevin: And so the formula, they're all clay.
Mark: Yes.
Clay with a little bit of lime.
Kevin: A little bit of lime.
Mark: Yeah.
Kevin: So are they just finding the clay deposits somewhere nearby and saying, "That's our brick material forever"?
Mark: So most clay is indigenous to the area that you're going to find a brick.
So this stuff here all came from the East Coast.
Kevin: I presume this comes from somewhere else.
Mark: Go out to Milwaukee and you're going to find that predominantly all the buildings are yellow Kevin: Because their clay is.
Mark: 'Cause the clay is yellow.
Kevin: Alright.
So, obviously I know this is brick, but at first glance I wouldn't necessarily think it was brick because it's like block or whatever.
Mark: Right.
Kevin: What's the story behind this design?
Mark: So this brick right here is more for aesthetics than anything.
You know, you and I just did a... Kevin: Mid-century modern house.
Mark: ...Mid-century modern house, and that's the particular brick that they use -- the size, the width, and the length.
Kevin: And these cells here, are these, what, strength?
Mark: So that's what we call a core.
Kevin: Core.
Mark: And I would take this brick, and, again, if it was on top of this one I would kind of wiggle it into place.
These cores would fill up and you'd get a much stronger bond.
Kevin: Very nice.
And then over here, really crisp corners.
Mark: Yes.
Kevin: So machine made.
Mark: Machine made.
Kevin: And very square.
Mark: Exactly.
This is what we're calling a modular brick.
Kevin: Because?
Mark: So the head joint is usually 3/8 of an inch.
The brick is 7 and 5/8.
So you combine the two you get an eight inch, and that way that helps us measure to windows, doors, that type of thing.
Kevin: Okay.
So, red, much darker.
Is this dye, or do they find a dark clay deposit?
Mark: No, that is dye.
And again, that seems to be what the look is today.
Kevin: So they just made that choice right there.
Very cool.
And then you brought us some sort of a fossil here, which is not brick, but... Mark: So, actually, Kevin, that is a brick.
Kevin: This is?
Mark: It started out as this size.
Kevin: It was that?
Mark: It was that.
So back in the day, we had to import our brick.
And as these ships got closer to the harbor, they would take these brick as they used for ballast.
So they would raise the ship to go into the harbor, and they would just toss them overboard.
Kevin: No kidding.
Mark: Yep.
Kevin: I thought they threw the Irishman overboard.
Mark: Well, we're here.
Kevin: So, history lesson -- 1,000 years back to mid-century modern.
If we looked into the future, what's coming your way?
Mark: So now everything has changed, and they're trying to make the outside of this wall have everything in it.
Waterproofing, insulation.
As you look behind us here, Kevin, we'll take this up.
Kevin: Oh, my goodness.
Mark: Yeah.
So, Kevin, what you see right here is what we call a thin brick.
And all that is is a slice off of a regular brick.
But you can see how thin it is.
Kevin: Just stuck to the Styrofoam.
Mark: Right.
So here's a steel stud wall.
Then there's sheetrock.
Then there's a waterproofer on it, then the insulation, and then the brick.
Kevin: So not as much material, R-value, but it's horrible.
What do you do with this?
Mark: Right.
So to me, this becomes a tile and all you do is grout it just like you would a tile.
Kevin: Oh, okay.
So is this your future?
Mark: It seems to be.
It seems to be.
My whole business has changed.
It's not like it was back when I was a student and learning how to lay brick.
It's all different now.
Kevin: Well, like I said, a Renaissance man.
Thanks for the history lesson.
Mark: Alright, Kevin.
♪♪ Richard: You must be Phil.
Phil: Hi, Richard.
Richard: Nice to meet you.
Phil: Thanks for coming.
Richard: My great pleasure.
Phil: I'm hoping you can help me.
Richard: Alright.
Phil: We recently painted the wainscoting in our dining room.
Richard: It looks great.
Phil: And the color of the baseboard heating cover doesn't match.
Richard: So you just ripped it apart?
Phil: Yes!
Richard: [ Laughs ] Phil: I actually looked for a video on replacing the cover.
I looked on thisoldhouse.com and I didn't see anything, so I'm hoping you can help me out.
Richard: Well, the ones we did probably are still on VHS or beta.
[ Laughter ] Well, maybe we can do two things.
Maybe we can fix this and we can actually get a video to fill that void, right?
Phil: That's great.
Richard: Alright, so the covers are all discolored.
Here's the bracket you took off.
So we can fix this.
Any other place in the building you want to think about?
Phil: Actually, there is, in the basement.
Richard: Alright.
Let's look.
Phil: And it's a similar situation down here in the basement, Richard.
So we recently repainted the walls and I replaced the outlet covers to match the trim board.
And I'm not sure if painting the baseboard heating cover would be the right approach.
Richard: You can paint it with an enamel paint, but it still is a 40-year-old product that's sort of dated.
So they make a cover now that you're going to go right over the top of this.
So all we need to do is a couple of different measurements.
One is the overall length.
So the standard base will usually come in one-foot increments from two feet to eight feet.
So this is 16 feet, so this is two eight-footers.
And the other measurement that we need because there's all different heights of baseboard is the overall height.
So that is what, about six and a half?
With these two measurements, I think we know what we need for this one and I can get the stuff for upstairs.
Phil: It's great.
Richard: I'll be back.
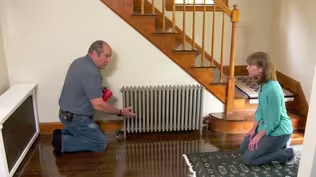
♪♪ Richard: Now, there are a lot of different covers for baseboards.
They come in metal.
They come in plastic.
This one's pretty simple and pretty straightforward.
It's plastic and it's a heat resistant plastic.
It's got these holes, and that's important to let the heat come out into the room.
And it couldn't be simpler as far as its installation.
You just snap it right over the existing stuff.
Phil: These look great.
Much easier than ripping out the old one.
Richard: Yeah, yeah.
These only come in six-footers, so we could cut them equal so that the splice plates are balanced.
But are you going to have a couch here?
Phil: We actually will.
Richard: Okay.
So we could actually put the two sixes and then just put the one cut piece down in the corner.
Phil: These are great.
This is really a clean look.
Richard: Okay.
And then the splice plate will just go... ...goes on like...
So, now the last piece, we're going to cut to about, what's that?
47 we will still be covered by that end cap.
47.
Why don't you throw your glasses...?
Oh, you got them?
Good.
Thank you.
Phil: So what should we use to cut this?
Richard: Well, it's going to be covered by the end cap.
Could be a handsaw.
It's...
It could be a pair of snips, but this circular saw will be perfect for us.
[ Saw whirring ] Okay, so we normally could just snap this on, but we have a little bit more work to do.
Slide this cover back.
Now you'll see right here that the pipe continues through the wall to the rest of the heating system.
And this end cap has a knockout.
You see how it's perforated right there?
So we can knock that out, allow for the pipe.
We also have to modify the height of the end cap.
This baseboard cover is made for a baseboard that's six and a half up to eight inches.
So with this rug right here, we're going to have to also make this a little bit shorter.
And there's perforation lines for that too.
And then finally of course they trimmed this with a little bit of wood trim.
So we're going to have to just cut that back a little bit, but not too bad.
[ Saw whirring ] [ Saw whirring ] There it is.
Okay.
Snap that down over.
Look at that!
Phil: That looks great.
Richard: Just snap that one on.
Get that right down.
Beauty.
Looks pretty good, huh?
Phil: It does.
Richard: Alright, so one call that I want to make is down here.
Now this covers different height of baseboard, and you've got this heavy pad and rug.
So it means that the gap at the bottom where the air goes into the baseboard is a little diminished, so it could mean a little less heat output.
So if you ever change this rug, go to a lighter pad, okay?
But I think you got plenty of baseboard.
Alright.
We are done down here.
Let's go check out great dining room.
Let's finish that.
Alright.
Because the old baseboard is gone, the nice job that you did getting rid of it.
Phil: Thanks.
Richard: It invites us to look at a different system, one that doesn't rely on the old baseboard and has its own bracket system.
So you can see with a typical six-foot section, there are brackets that come with it, and those are designed to mount onto the wall.
And this will hold up the heating element... and then this will hold up the cover right here.
So I've made a little mock up right here.
You can see that the heating element would sit right here and the heat would come out here.
But right on the back are these two panels, and that's really only -- so if you look down you would see the white, not the wall color.
And this is if you look from the side...matches, okay?
So the key to this is to get these brackets mounted onto the wall at a place where we've got good structure.
So I want you to grab that stud finder and just double check.
I mean, it should be where the old brackets were.
Should be fine.
Phil: Yeah.
Richard: Right there.
We'll get that all marked.
Phil: Beauty.
Richard: The best way to get them in is there's always a little play in the middle I'll pass this down to you.
We want this to be level, obviously, but we can assume that this floor is level.
And now we just want to secure these.
You don't want to over tighten these.
You want enough for the cover to fit in there, and you don't want to break the bracket.
There you go.
Go.
[ Screw gun whirring ] Good.
As copper finned baseboard heats up, it wants to expand longitudinally.
So the manufacturer makes these releases, these plastic pieces that are designed to stick onto the element and go against the brackets.
So as it goes this way, it might not make a crinkling noise on the bracket.
Glad you didn't throw them out.
♪♪ That end cap's gonna go right in there tucked in nicely.
So the top cover plate goes onto the bracket.
It wants to have the curve facing out and up, so that will cover these brackets.
And the same thing on the bottom.
And then push it.
[ Snap ] There it is.
Alright.
Now we have a cover plate.
♪♪ There it is.
♪♪ So what do you think?
Phil: I think this looks great.
Thank you, Richard.
Richard: Well, here in this house we found two different solutions -- similar but great ones to cover that baseboard.
Phil: I agree.
And now there's a video.
Richard: That's right.
Thanks to you.
And if you find there are missing videos in your life that you need to have us do, don't hesitate to call, to write, or send smoke signals.
Don't send them to me, but send them to us.
Until next time, I'm Richard Trethewey for "Ask This Old House."
Kevin: Next time on "Ask This Old House"... Jenn returns to her roots in Florida to help a homeowner plant fruit trees.
Jenn: Perfect.
So this is one of the key limes.
Kevin: Then Ross shows some new trends in smart lighting... ...and Nathan shares a tool that's given his roofing game a lift.
All that on "Ask This Old House."


Support for PBS provided by:
Funding for THIS OLD HOUSE is provided by The Home Depot and Renewal By Andersen.